18 May 2015

A Welcome Basket

Hi there, friends!  I'm up today at the 
SIMPLE STORIES BLOG
with a sweet "Welcome Baby" basket brimming with paper flowers
 and baby's info; such a wonderful keepsake for a new mom!

For this project I have used the "Enchanted Collection"...it's ideal for any of
 those little girl projects, even to welcome baby.  The wooden box is one that
 I found at Michael's and measures approximately 4.25"W X 5.5"H X 2"D.  I traced
 the front and back of the box onto a piece of the "Rose" Simple Basic paper and
 then cut out.  Adhesive was applied with the Xyron Creative Station and attached to box.

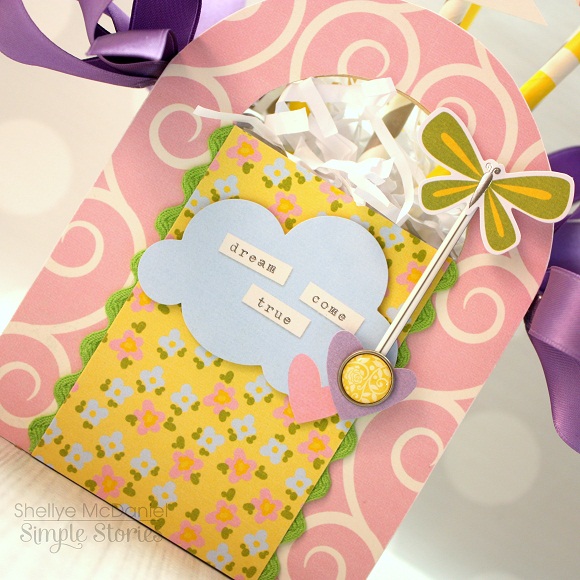
To the front, one of the printed sides of the 3X4 SN@P! cards was edged in green
 ric rac and embellished with a sentiment cloud from the Bits & Pieces pack. 
 A butterfly was attached to a pixie stick straw and attached with a glue dot.


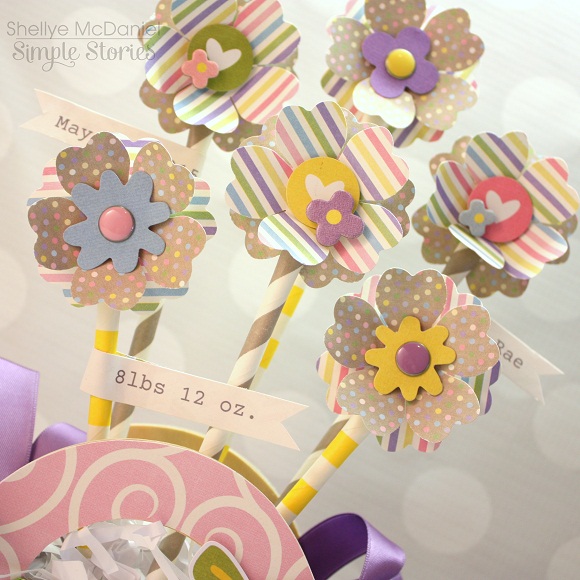
From the 6X6 paper pad, blooms were punched using the Floriana punch by McGill. 
Two blooms were layered together and then attached to a paper straw.  Floral
 foam was inserted into the box and the flowers arranged in a staggered fashion.  
The baby info was printed off using my home printer and then cut into strips and
 glued to the straws.  Various Bradz, Bits & Pieces and chipboard 
stickers were added to the centers of the blooms.

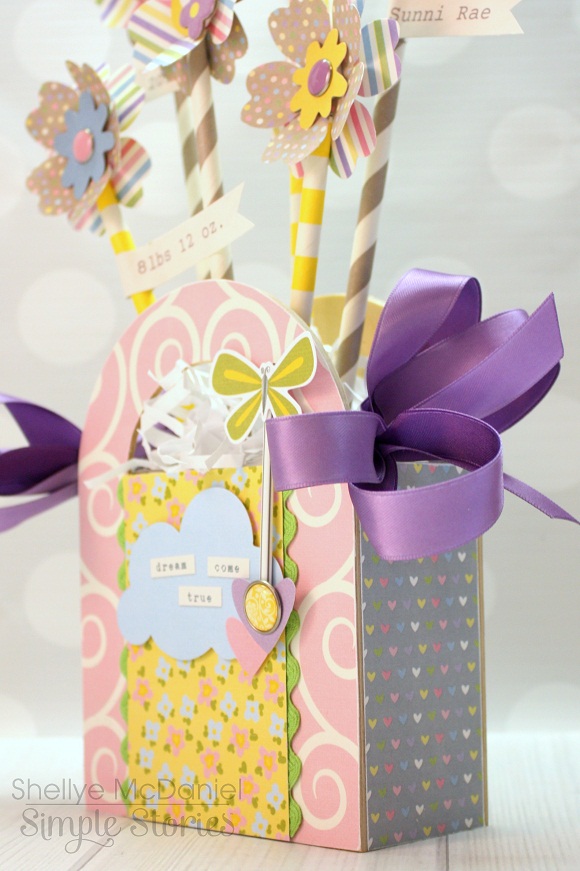
The sides of the box were covered with strips cut from 6X6 paper and satin bows
 were glued to the sides.

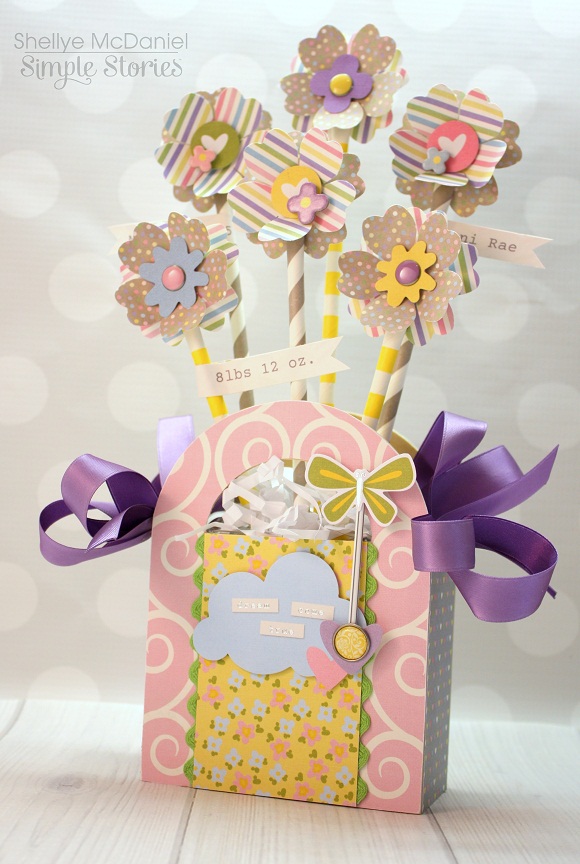
This would also make an adorable centerpiece for a baby shower or a nursery decoration!

Products:
Enchanted Collection- 

4416 Rose Paper
4427Bradz
 
 The newest collections have been revealed at Simple Stories too!
Stop by and have a look :) www.simplestories.com

13 May 2015

Hello Summer Wreath

My patio door will be all decked out with this colorful Summer
wreath that I made with the "Beach Party" Mini Collection by
ECHO PARK PAPER

Paper wreaths come in all shapes and styles and today I’m sharing my version 
of a fun “Hello Summer” wreath that will brighten an entry way or covered door
 during the Summer months! I started with a 7” wire wreath base and twelve 12” 
strips cut from two patterned papers (total of 24 strips) from the “Beach Party”
 Mini Collection.  The strips were cut 1” wide.

 The strips were folded in half with the center of the fold placed over the inner ring
 of the wreath.  The top flap of the strip was inserted back through the outer ring
 and glued in place to the back flap.


A circle of chipboard and solid red paper were cut to be a bit larger than the center
 opening of the wreath.  The two pieces were glued together and then attached to
 the back of the wreath.  A journal card was cut-out and attached to the center
 of the circle with foam adhesive.

To add even more fun (and to hide the bottom metal ring), strips of 5/8” grosgrain
 ribbon were knotted or tied into bows around the perimeter.  Approximately 4 yards
 of the navy ribbon was used to make the bows and 2 yards each of the red and
orange ribbon were used to make the knotted pieces.


A large eyelet was set into the top paper strip and a piece of white string was
 knotted through for a hanger. Now it's all ready for displaying and greeting guests!


See more project ideas on the Echo Park Paper Blog!

05 May 2015

Birthday Girl Gift Album

Make this special mini album as a gift for the birthday girl’s mom
she would love a place to document that first birthday with photos and journaling
of the day's events.  
The album features the new "Birthday Girl" Collection by
ECHO PARK PAPER
 
 
Begin by making the base pages.  Start with the Set of Frames from the
 Silhouette Design Store. The largest scallop frame and the ric-rac style frame were
 used and cut from Carta Bella’s Linen cardstock.  The pages graduated in size from 
 4.5”X4.5” for the cover and 6.5”X6.5” for the back page.  Two of the same shape were
 cut and then adhered together to form a sturdier page.

A scalloped mat was cut for the front cover using the Scallop Nesting Dies and then
 layered with stickers from the Birthday Girl Alpha and Element Sticker Sheets.

This particular album is a flip-up style album, so keep that in mind when planning
 out the embellishments and paper’s pattern direction.  Off-set embellishments
 (especially if foam adhesive has been used) so that the pages will rest neatly
 against one another.

 Mix in enamel dots and decorative brads from other collections to dress up the pages.


Because of the smaller design scale, the 6X6 Paper Pad pages are just 
perfect for mini albums!

Products:

04 May 2015

Darlene

A happy Monday to you all!
As I wrap up on using the April "Darlene" Kit and Add-On Kit by
SCRAPTASTIC CLUB
I thought it would be fittin' to share all of the fun cards
that I've made with the kits!

"Hello" card featuring an exclusive wood veneer piece, journal card and 
patterned paper designed by Scraptastic Club

"Enjoy" card featuring an exclusive acrylic arrow, flair, feather stencil and paper!

"Thankful 4 U" card featuring exclusive paper and flair

"Love Today" card featuring exclusive papers, wood veneer and clear stamps!

"Hello" banner card featuring exclusive die-cut, journal tag and paper

"Hello" bicycle card featuring exclusive journal card.
Scraptastic Club kits showcase fabulous designs from Kaitlin Sheaffer...
and as a club member, you will also have access to cutting files and printables :)
Join us today at www.scraptasticclub.com

27 April 2015

Mother's Day With Basic Grey


One thing about moms: they love a handmade card, especially when it’s handmade by you!
 I’ve employed the beautiful new “Tea Garden” Collection in making these two cards for my Mom and Mother-in-law for the upcoming Mother’s Day on May 10th.

 The first card features a design that I like to use a lot, especially when incorporating
 a vertical journal card. I trimmed the journal card down a bit so that it could be
 matted with a border of the green dot paper from the collection. The green paper
 was outlined (on the back) in a chenille ric-rac trim and then attached to the
 center of the card front.

The focal point of the card consists of a die-cut piece that I created with the “Labels 14”
 die by Spellbinders. I layered on one of the pretty label stickers and then affixed
 the letters to spell out “mom”. The little bird was hand-cut from the “Chai” paper.
A trio of resin flowers from the “Vivenne” collection was added to complete the look.

 The second card is 6X6 in size, which accommodates the large die-cut doily shape nicely.
A 4” circle was cut from the “Spiced” paper and then trimmed around the edge with a
 dainty picot cording.


From the back of the “Green Tea” paper, the letter “M” and the flower around it were
hand-cut and attached to the center of the circle with foam adhesive.
The circle sticker was snipped apart and then looped around the square.
Medium sized light green Candy Dots dressed up the sticker.
With the “Tea Garden” Collection, the ideas are endless when it comes to
 making beautiful cards for any occasion!
See more ideas at the Basic Grey Blog!
 

20 April 2015

Jack and Jill Framed

This past week I shared a couple of cards over at the 
ECHO PARK PAPER BLOG
 focusing on using dies to create interesting frames
  featuring the “Jack and Jill” Collection.
 

For the first card we are using the Arrows Die Set and its larger curved die 
and the smaller pointer die. 

Die cut four of the larger arrow from the “Pool” (orange) patterned paper found
 in the 6X6 Jack and Jill: Jack Paper Pad.  Die cut four of the smaller arrow from
 the solid Red/Blue paper.  Adhere the red arrows to the pointer ends of the orange arrows.

Next, cut a 3.75”X3.75” square from the blue side of the Red/Blue paper. 
 Corner round each end with a rounding punch.  Using a 2.5” square punch or die, 
die-cut the “Be proud of who you are” sentiment from the center of the journal card paper.  Adhere it to the center of the blue square paper with foam adhesive.

Arrange the large arrows around the edge of the sentiment; attach with foam adhesive.  Embellish as desired with stickers, brads and chipboard pieces from the collection.

 The second card is a reverse 3-D card.  Although there is a lot of dimension, the
 building of the pieces start by layering three matted papers with foam tape in
 between each layer.

The card base is a 4.25”X5.5”.  The first mat layer was cut from the
 solid Light Pink/Brown paper to 4 1/8” X 5 3/8” and attached to the center of the card. 
 The next layer was cut from the solid Teal/Yellow paper to 4”X5.25”.  The largest die
 from the Designer Label Set #1 was placed onto the yellow paper, approximately ½”
 from the top and then die-cut from the paper.  Foam adhesive tape was attached
 around the edges of the paper, below the die-cut area and then adhered to the 
 center of the pink paper.

For the final layer, a 3.75”X5” mat was cut from the 6X6 Chandeliers (woodgrain) 
paper found in the Jack and Jill: Jill Paper Pad.  Again, the large label was die-cut ½”
 from the top of the paper.  The paper was then added to the top of the yellow paper
 with foam adhesive tape.

 The label piece that was die cut from the Chandelier paper (above) was then
 glued to the center of the label frame.


Finally, the two smaller labels were cut from papers from the 6X6 paper pad and
 then attached with liquid glue and foam adhesive.  Stickers, a chipboard
 sentiment and enamel dots from the Jack and Jill: Jill Collection completed the card.

See the newest release reveals and more ideas at www.echoparkpaperblog.com
 Happy new week, friends!

06 April 2015

Sunny Days Are Ahead

Love singing in the rain or splashing in puddles?  
Make a cute mini album that captures all of those rainy spring memories 
with the “Sunny Days Ahead” Collection by
ECHO PARK PAPER

 
I started with a tabbed chipboard album that I had on hand and used
 Carta Bella’s Kraft Paper for the base pages.  I cut smaller mats from various
 “Sunny Days Ahead” papers and machine stitched them in place 
before adhering to the chipboard.

On the front cover I used a round punch and a piece from the 6X6 paper pad to make the journal card’s sun 3-D; just adhere with foam adhesive and you have a really fun look.


 If you’re giving your album as a gift, print off a few related photos (I found mine 
on the internet by searching for “vintage rain photos”) and add them to the
 pages with repositionable adhesive.  This is a good way to show 
placement ideas to the recipient.


Next, the “Spring” sentiment was die-cut from the  “Spring Flowers Die”
I wanted the letters to follow the contour of the sun shape, so I snipped the letters
 apart and then affixed them to the image.


The small number stickers from the Element Sticker Sheet are the perfect
bullet points for the journal card…add a list of your favorite spring activities.


 Again, I used a round die to change the shape of the “sunny days ahead” journal card, 
which made it a better fit for the small page.


 Dress up the stickers with dimension by adding enamel dots and brads!

Here is a list of supplies that I used:
 SDA82002 Sun Ahead
SDA82003 Rain Boots
SDA82004 Umbrellas
SDA82005 Clouds
SDA82006 Rainbow Stripe
SDA82014 Sticker Sheet
SDA82023 6x6 Paper Pad
SDA82030 Spring Flowers Die
JJG81020 Assorted Brads
AG74020 Anything Goes Brad Set
JJG81028 Enamel Dots
BJGT79028 Enamel Dots

Have a wonderful week!
Older Posts Home
 
SITE DESIGN BY DESIGNER BLOGS